


|
||

|

|
|

|
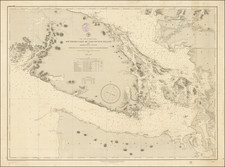
Fine, Famed Map of the North Pacific from Cook’s Third Voyage—First Edition!
Rare, first edition of the so-called “lost” chart of Captain James Cook, published in 1784 by William Faden.
The map illustrates in great detail the known and unknown regions along the Northern Pacific coastlines of America and Asia, illustrating Cook's routes in 1778 and 1779 in red and blue. While not specifically noted on this chart, the areas of British, Russian and Spanish Discoveries are also coded in red (British discoveries), blue (Russian discoveries) and yellow (Spanish discoveries). A similar coding is employed (and annotated) on the Faden edition of Henry Roberts' A General Chart Exhibiting the Discoveries made by Captn. James Cook . . ., first published in 1784.
This extraordinary map was prepared by Cook's primary cartographic assistant on his third voyage, Lieutenant Henry Roberts. Roberts served as the Master's Mate on the HMS Resolution. The chart was originally prepared by Roberts for the atlas which accompanied the official account of Cook's third voyage (A Voyage to the Pacific Ocean. . . , London: 1784), but because of disputes among the editors, it was not included in the final publication of the official account.
It is now known that the plate for the Roberts chart, which is considerably more detailed than the corresponding chart included with the official account, was purchased by London map publisher William Faden and published separately.
In addition to showing Cook's discoveries, the Faden-Roberts chart is the first published map to show the discoveries of Samuel Hearn in the Canadian Arctic. Hearn was the first European to make an overland tip via Canada to the Arctic Ocean (1770-1772). His observations were the first to show the outline of the coast in those areas, and he named the Coppermine River. Hearn's journal and maps were not published until 1795; their portrayal here is based on a ca. 1772 manuscript map held by the Hudson’s Bay Company.
Cook’s third voyage
After two Pacific cruises that observed the Transit of Venus, charted New Zealand, the eastern coast of Australia, and many islands; and disproved the existence of a vast southern continent, Cook’s third voyage focused on searching for the Northwest Passage. It was also tasked with the return of Mai, a Ra’iatean man and the first Polynesian visitor to Britain, who had joined Cook’s second voyage.
Cook in the Resolution was joined by Charles Clerke in the Discovery. Resolution sailed in July from Plymouth, rounded the Cape of Good Hope, visited the Kerguelen group in the Southern Indian Ocean, then called at Tasmania before heading to New Zealand.
In the spring of 1777, the ships sailed north, first to Tonga, and then to Tahiti. They left Mai on Huahine, in a wooden house built for him by the crew. Cook continued north, and became the first European to encounter the Hawaiian Islands, in January 1778.
During the warm months (in the northern hemisphere) of 1778, Cook and his crew charted the northwestern coast of North America, calling at Nootka Sound and Prince William Sound. They went up the Cook Inlet, which they thought could be a Northwest Passage, but it proved to be a false start. Heading west, they skirted the Aleutians and sighted the Asian coast. In January 1779, they returned to Hawai’i to resupply and rest.
In Kealakekua Bay, Cook was greeted warmly by the Hawaiians. They stayed for three weeks, enjoying the considerable hospitality of the people. In early February, the ships set out for another northern tour, but only a few days from Hawai’i the Resolution’s mast was damaged, forcing their return.
This time, they were not welcomed by crowds. During a dispute over a stolen boat, a scuffle broke out. When it was over, sixteen Hawaiians, four marines, and Cook were dead.
Clerke took command. He forced the Hawaiians to give him Cook’s remains, which were buried at sea. He then led the ships north, passing through the Bering Strait before turning back due to ice. In August of 1779, Clerke too died, of consumption, while near Kamchatka. A third commander, John Gore, then had to lead the ships home.
The ships sighted Japan on their southward journey before calling at Macao. There, they made sizeable profits by selling sea otter pelts, kickstarting a new industry. By April 1780, the Resolution and Discovery were back at the Cape of Good Hope. They returned to Britain via the Orkneys, anchoring in the Thames on October 7, 1780.
Cartographic disputes in the official voyage account
Cook's death left the production of the expedition's findings to two camps of editors. Henry Roberts and James King, the authors of the charts and journals and participants in the expedition, found themselves at constant odds with Alexander Dalrymple, Cook's longtime rival, Sir Joseph Banks, and Lord Keppel, among others. The production process was highly contentious. As noted by Hellen Wallis:
The maps and engravings were a major source of disagreement between the editors and the committee whose proceedings seem to have become more arbitrary with the succession of Keppel as First Lord. Banks and Webber [the voyage artist] supervised the engraving of the drawings while Alexander Dalrymple (none other) "at Lord Sandwich's desire," had direction of the charts and coastal views, with the exception of the general chart. Under the sole direction of the Admiralty this was being prepared by Lieutenant Henry Roberts, who had served as master's mate in the Resolution under William Bligh.
In a report by James King regarding a meeting he had with Sir Joseph Banks (King letter to Dr. John Douglas on July 25, 1782), King stated:
I was received coldly, perhaps owing to my having desired the engraver of the Genl. map not to proceed with it till further enquiry should be made whether the original plan of it should be altered in the way it was by Mr .Dalrymple . . . Sir Joseph then waited on Lord Keppel . . . the consequence was that his Lordship left the entire direction of the engraving of Mr. Webbers drawings as well as of the maps to him, upon which Sir Jos. summoned Mr. Roberts to lay before him the state of the Genl. map; desired him to give the drawings to him & told him that he had nothing further to do with it; as he should make what alterations in it he pleased, & be responsible for the propriety of those alterations & for its being engraved; Mr . Roberts finds himself very strangely treated by Sir Jos. & refused for the present complying with Sir Jos. request.
Upon finding that it was the declared intention of Sir Jos & Mr. Dalrymple to introduce tracts & alterations in this Genl. map which would rest upon Mr. Dalrymples authority only & that the motives for which, were to contradict some oppinions (sic) given by C. Cook, I begged Lord Duncannon would show Lord Keppel a few lines I wrote of the state of the publication, & that I took it for granted his Lordship would not authorise any alterations in maps without my being consulted. When I sent this to Lord Duncannon I did not know of the power that Lord Keppel had given Sir Jos. The answer I received was, that Lord Keppel could not recede from the promise he had given Sir Jos. When Mr. Roberts found that I was too insignificant to be consulted in these matters, he declared he would have nothing further to do with the map, as long as it was to be altered at the pleasure of those who had used him so ill, & who even told him, that it was not to be considered as a map of his drawing.
Dalrymple and Banks won out, and Roberts' chart was replaced with the less-detailed map engraved by T. Harmar. As reported by King in a letter to the account’s editor, Dr John Douglas, on December 13, 1783:
The [Dalrymple] & Sir Jos. are determined to have their Polar map & not mine, & to have none of the Hudson bay Companies discoveries inserted saying that these things are only proper in the General Chart."
As noted by Helen Wallis:
This shows that the "Chart of the NW Coast of America and NE Coast of Asia" was the design of Dalrymple in collaboration with Banks, and explains the omission of any interior details of North America and of the name King George's Sound.
Roberts' "lost chart" contains a number of place names not found on the authorized version. The Roberts chart also includes important information, which had never previously appeared in print, showing the Coppermine River (information probably suppressed for commercial reasons by the Hudson's Bay Company) and the impossibility of a Northwest Passage through Hudson's Bay to the Pacific Ocean.
It was not understood that Roberts' chart and the Faden were the same until 1985, when the British Library acquired a proof state of the map. Roberts had sold his copperplate to Faden, who published the "lost chart" a month after the publication of the official atlas. The Roberts-Faden map contains fourteen Alaskan place names not on the authorized map, including Bald Head, Cape Denbigh and Cape Darby in Norton Sound. It also shows, for the first time on any printed map, the results of Hearn's expedition in the Canadian Arctic.
Faden published another edition of this map in 1794, which had been re-engraved by Louis Stanislas D'Arcy de la Rochette. It expanded on this first edition, including more information from the mid-eighteenth-century Russian expeditions to the North Pacific, reports from whalers, as well as George Vancouver’s recent findings in what is now British Columbia.
William Faden (1749-1836) was the most prominent London mapmaker and publisher of the late-eighteenth and early-nineteenth centuries. His father, William Mackfaden, was a printer who dropped the first part of his last name due to the Jacobite rising of 1745.
Apprenticed to an engraver in the Clothworkers' Company, he was made free of the Company in August of 1771. He entered into a partnership with the family of Thomas Jeffreys, a prolific and well-respected mapmaker who had recently died in 1771. This partnership lasted until 1776.
Also in 1776, Faden joined the Society of Civil Engineers, which later changed its name to the Smeatonian Society of Civil Engineers. The Smeatonians operated as an elite, yet practical, dining club and his membership led Faden to several engineering publications, including canal plans and plans of other new engineering projects.
Faden's star rose during the American Revolution, when he produced popular maps and atlases focused on the American colonies and the battles that raged within them. In 1783, just as the war ended, Faden inherited his father's estate, allowing him to fully control his business and expand it; in the same year he gained the title "Geographer in Ordinary to his Majesty."
Faden also commanded a large stock of British county maps, which made him attractive as a partner to the Ordnance Survey; he published the first Ordnance map in 1801, a map of Kent. The Admiralty also admired his work and acquired some of his plates which were re-issued as official naval charts.
Faden was renowned for his ingenuity as well as his business acumen. In 1796 he was awarded a gold medal by the Society of Arts. With his brother-in-law, the astronomer and painter John Russell, he created the first extant lunar globe.
After retiring in 1823 the lucrative business passed to James Wyld, a former apprentice. He died in Shepperton in 1826, leaving a large estate.
![[Heightened with Gold] Paskaert Zynde de Noordelijckste Zeekusten van America van Groenland door de Straet Davis en de Straet Hudson tot Terra Neuf . . .](https://storage.googleapis.com/raremaps/img/small/93148.jpg)